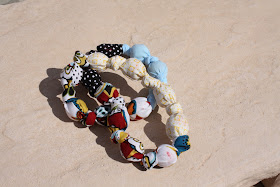
Before I get to why / how I made this, I must tell a super cute story. On Tuesday morning, I decided to wear this necklace to work so I could have a friend take a picture of it during the daylight hours. So that morning, as I was dropping the girls off at the sitter’s house, my littlest said … “ohhh, pop pop! I want pop pop!” (Both my kids call lollipops “pop pops”). She started fingering the necklace and was really into it. Couple minutes later I was still there (it’s pretty hard to say goodbye) and she came up again and said “hold me Mama.” Who can say no to that? I picked her up and she started in again with “I want a pop pop Mama…Unwrap it. Unwrap it. Unwrap it.” She really thinks that there are pop pops in my necklace and all she has to do is get the wrappers off. I do love her!
As I was thinking about scrapbusters, I remembered a necklace I saw years ago from Amy Butler. So I went to Google and found it again; here’s the link: http://www.amybutlerdesign.com/pdfs/FabricNecklace.pdf
I printed it off and thought – a ha! What a perfect little Scrapbuster! And then, I started reading the pattern and realize it just wasn’t going to work for me … you have to make your own bias strips per the pattern (and that is just NOT scrap busting kind of thing!) You end up “wasting” all those other pieces.
Again, I turned to Google and found that someone else thought there had to be an easier way to make such a necklace. Yay! I found the blog Joy’s Hope and used her instructions without any modification; link here: Tutorial from Joy's Hope for "Easter Fabric Necklace".
Materials for this Scrapbuster:
· 5 fabric pieces cut to 4” x 18”
· 16-… 1” wooden beads or Styrofoam balls (I used 18 wooden beads)
· Regular sewing supplies
· Good DVR material to accompany you!
(doesn't matter how big the holes are for the beads - they'll be covered up)
Literally, you spend about 5 minutes cutting the strips, 5 minutes sewing the strips into a long tube, and then you can camp out in front of the DVR. The rest is SO easy! Flip the tube, and start stuffing the beads in the necklace. I used 18 x 1” beads in my necklace and it does fit nicely over my head.
The cost of this was $3 (for the beads) … with Mother’s Day coming up, I think some spring versions would make awesome gifts! Just think, you can scrap bust, spend $3 and give a totally homemade gift to someone.
this is my fake "bead" ...aka where I joined the 2 ends!
Oh, and I think Christmas’y ones would be adorable too.
Final thought – I’ll be making two little girls a couple of these too … but I think they may be disappointed when they realize there aren’t really pop pops in them!


I'm working on bracelets like this for my granddaughters. (They are teens, and the project is for Christmas, so it'll be a while before I find out if they are cool or not.) Thanks for the tut, though, I was having trouble figureing out the ends.
ReplyDelete