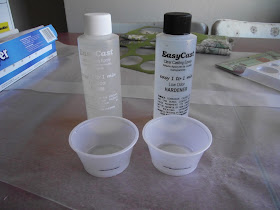
Let the casting begin! We’re going to start with a fabric encased pendant.
Materials
Castin' Craft's Easy Cast resin (you can buy something else, but the instructions here are specific to Easy Cast; be sure to make adjustments for curing times and mixing ratios if you use a different kind)(enter our Easy Cast giveaway here)
Scraps of fabric (paper will work too)
Decoupage medium (or watered down white glue)
Craft Brush
Disposable gloves
Safety goggles
Small plastic cups (the kind you get take out salad dressing in, yogurt cups, sour cream containers, etc.)
Popsicle sticks for stirring
Popsicle sticks for stirring
A mold (I’m using an Easy Cast mold, but you can use any mold you like)
Mold release spray (optional)
Dremel drill
Heat gun or hair dryer (with a low setting) for degassing
Instructions
Step 1: Cover your work surface with wax paper and gather all your supplies together. You don’t want to be running all over your house looking for things when you do this. Believe me, I have a bad habit of doing just that. Learn from me how to not be an idiot.
 |
| Preparing my work area |
 |
| Decoupage the fabric to seal it using matte decoupage medium. |
 |
| Cut out fabric once dry. |
Step 4: Put your gloves and goggles on because we are going to mix our resin! You can make your own measuring cup by taking two containers that are exactly the same and marking a line at the same height on each container. To do this, pour water into one cup and mark the line, then pour the water from that cup into a second cup and mark a line on that. They should be equal. Now dump the water and dry your cups.
You won’t need much resin for this project so don’t go overboard. Roughly two tablespoons of hardener and two tablespoons of resin will be about right for two pendants.
 |
| Add water to first cup and draw a line at the waterline. |
 |
| Pour the water from the first cup to the second cup and mark the waterline. Now you have equivalent measuring cups. |
 |
| Pour the resin into one cup and the hardener into the other. |
Once you have measured your resin, pour them together into a third cup. Take your popsicle stick and start to stir. You want to stir constantly for 2 minutes. You don’t have to stir fast; go at a steady, constant pace. Make sure you scrape the sides of the cup with your popsicle stick.
Step 5: Fill your mold about half full with mixed resin. Take your heat gun (or dryer set to low), turn it on, then move it so it’s blowing on the resin about 4-6 inches above the surface. We are doing this to degas the resin which eliminates bubbles. Be careful when you do this to avoid splashing!
 |
| Fill mold half full. You can see all the nasty bubbles. |
 |
| Degas with a heat gun. If you don't have a heat gun, try a blow dryer on the low setting. It's not heat that degases it, but carbon dioxide. |
 |
| Now the resin is crystal clear. |
 |
| Lay your fabric on the resin. |
Step 8: This is the single hardest part of the process! You now have to wait and do your very best not to mess with the casting until it is fully cured. This will be like torture because you will want to touch it and you’ll ruin it if you do. Curing will take approximately 24 hours, depending on where you live. I live in Arizona which is dry and hot so resin cures faster here than it would in Minneapolis on a muggy, August day.
Step 9: After waiting for 24 hours, you can finally touch your cast piece. Yay! Just pop it out of the mold. If you have problems popping it out of the mold, try putting it in the refrigerator for an hour or so.
 |
| The finished product! |
Tips
- I read a tip somewhere that you should keep a mirror on the table so you can lift the mold up, hold it over the mirror and see what your casting will look like (and alleviate your desire to touch it before it’s dry). Do not try to look under it or you risk spilling your resin (possibly in your eyes!).
- If your casting is too soft or rubbery, it’s because the resin wasn’t mixed at the proper ratio or it was too cold. Let it cure for another day to see if that helps. Read those instructions!
- Do not sand the surface of your casting, just the edges. Sanding the surface will make the pendant look scuffed.
- Don’t be discouraged if you mess up some of your castings. Sometimes, I feel like I’ve had more screw ups than successes. It’s still fun!
I'll be back next week with another resin casting project!


WOW! That is so neat! Thank you for sharing. I've been wanting to learn to cast in resin. Beautiful!!!!
ReplyDeletethis is so cute!! what an awesome pendant!
ReplyDeleteI'd love for you to link this up to my new link party, Your Whims Wednesday! http://mygirlishwhims.blogspot.com/2011/04/your-whims-wednesday-1.html
super nice idea..lovely
ReplyDeletethank you for the tutorial on resin..it was clear and extremely informative!! I am at the beach and trying to save a couple of teenie tiny sand dollars.. I know they wont make it home.. Question... I want to put the hookie thing on without drilling.. the part that has the straight thing with the loop (I dont even know what to call it when I buy one).. you said to drill.. how do I fasten this so it wont fall out?? thanks bajreeve@yahoo.com
ReplyDeleteThis comment has been removed by the author.
ReplyDeleteSorry about the miss spells
ReplyDelete