Give thanks...although I try to do it everyday, now is the season to deck the halls with it, right!
For this challenge, I was sort of all over the place with what to do. I settled on making a banner, bunting, garland thing (what is the official word?). But, I was again all over the place -- to use all felt, to make triangle shaped flags, to use woven or linen? Then, I found some leftover linen and decided to go for that organic look. It sort of fell into place then.
I found these felt leaves from last Thanksgiving (I bought them for my kids to play with and these were our leftovers - yay!). Also, I recently bought this Martha Stewart paint set on sale at Michael's; it's Pearl and Metallic and I've been dying to try it! Once I had all the "ingredients" in place (sidebar: it's so nice to have finally built up SUCH a craft supply that I practically never need to shop to create; it's all already here!) this came together nicely.
I put together a quick tutorial below with pictoral step by step.
 |
| Close up of the letters - these colors are truly amazing! The really are pearly or metallic :) |
Tutorial Pictoral Step by Step
Supplies:
- Linen (or canvas, burlap or whatever fabric you so choose)
- Fabric Paint (I used this: Martha Stewart's Pearl and Metallic Paint)
- Sponges for painting
- Freezer Paper & Exacto Knife (unless you have a Silhouette machine!)
- Felt Leaves (you can buy them or make your own)
- Twine or other string to hang
- Sewing Machine, pins, etc.
Directions:
 |
| This was my testing of colors to narrow it down to four. |
 |
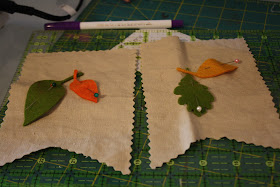
| Pining leaves into place .... two "flags" have just leaves on them and no letters. |
 |
| The four selected colors. |
 |
| Stack of 12 "flags" |
Cut linen into twelve 4.5" x 7" rectangles. I used a pinking blade to make these a little more decorative.
Stack 6 up and cut to make "fish tails" on one end. Repeat with other six. I am calling these "FLAGS."
 |
| Freezer paper stencils pressed into place ... flags are ready to be painted! |
Cut all the letters out; save any "holes" from letters like "a" that have a center!
Press freezer paper onto linen.
 |
| Lovely paint colors! |
Paint away! I find it works best to dab the paint onto my stencil as it prevents bleeding.
If you wish, add a couple of small circles or "dots" onto your linen flags like I did.
 |
| Everything's painted .... just waiting for it to dry. |
Peel off stencils ...
 |
| Sooo pretty! Pinning a couple extra leaves into place |
- Arrange leftover felt leaves onto flags; pin in place; sew to secure.
- Press the top of each flag over 1/2 inch; pin to secure. This will make a casing for the twine to go through.
 |
| Fold the top of each flag over 1/2" inch to create a casing for the twine. |
Arrange flags (give thanks) in order leaving approximately 1/2" inch between letters / flags.
Take the twine and tuck it under the folded over edge of each flag; pin in place.
Go to sewing machine and starting at the beginning ... sew the folded over top flap (the 1/2" you pressed) into place as this will secure the twine. When you get to a space between flags, just sew right over the twine. I found that using a longer stitch length made this easier and faster!
Sew to end and you're done!
 |
| Grab your twine and string away! |
Hang on the wall, smile and give thanks!
As I was taking pictures of the banner, my first little miracle popped up and wanted to be in the picture. Yes, I give thanks for her daily :)
If you have any questions about anything, just leave a comment and we'll get back to you! :) Happy Thanksgiving a little early....oh and don't forget to vote!


No comments:
Post a Comment