 |
shorts, it doesn't work. Anyway ... I needed some way to keep track of what was what. Enter the clothing label.
In the big craft store recently, I saw this "inkjet transfer paper" by Transfer Magic and decided to try it. Fail. I thought the care instructions were a tad ridiculous anyway. It says you must WAIT 24 hours after applying the transfer to wash the clothes. Also, machine wash separately the first time you wash after applying the transfer. Really? Then ... immediately remove garment from washer or colors may bleed. No thanks. Final straw - tumble dry on warm setting. What, as opposed to line drying them? For whatever reason, this just seemed too burdensome to me. Nevertheless, I tried it. The transfer looks good on the transfer paper, but after it went on the garment, it felt like actual plastic! I mean it was actually slick to the touch. I followed the washing instructions precisely (and tried avoiding the instructions as well, on some other garments) and in all cases, this plastic'y transfer didn't work for me.
I remember seeing something on Lil Blue Boo a while back about making clothing labels, so I google'd it and found this post. She recommends Dharma Trading Company's Super Soft Inkjet Transfer Paper. I ordered it ... tried it, and LOVE it!
It actually is really soft - adheres easily and holds up after washing. I've started putting clothing labels on all the girls clothes and it's a really nice touch. (I actually went back and added them to just about everything I've ever made -whew!).
Anyway, now, I don't have to hold up two pairs of shorts and try to figure out whose is whose!
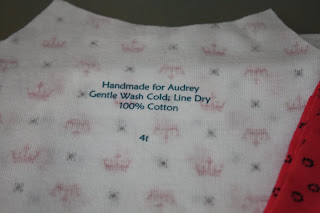
I just made up a bunch of little labels on a full 8.5 x 11 sheet ... that way I can cut and iron on depending on what I want the 'label' to say. For example, I have lots of "Handmade" and then some that say "Handmade for Audrey" or "Handmade for Isabelle" ... I made several sets of the standard wash instructions, and then a ton of size markers (2t, 2/3t, 3t, etc).
TIP: If you remember, it's SUPER easy to add the label to the inside back piece BEFORE you sew up the clothes! (See below)
Next up - I want to try the Transfer Paper for something else - larger! I'll keep you posted :)
ps- I saw on Tip Junkie the other day a tutorial for another (similar) method of making labels. This one calls for using Printable Fabric which is SEWN onto the garment. I like this for an option too ... I actually have some printable fabric on hand and may give this a try too! :)
 Pin It


3 comments:
This is a great idea!
It was a very good post indeed. I thoroughly enjoyed reading it in my lunch time. Will surely come and visit this blog more often. Thanks for sharing. textile labels
A Transparent PP sheet is perfect when you need clarity and toughness. Often used in folders, signage, and displays, these sheets maintain visibility without compromising strength. Check out the latest collection of Transparent PP sheets available in various sizes.
Post a Comment